Planning a Kitchen Renovation Around Sockets, Switches and Windows: The Splashback Layout Guide UK Homeowners Wish They’d Read First

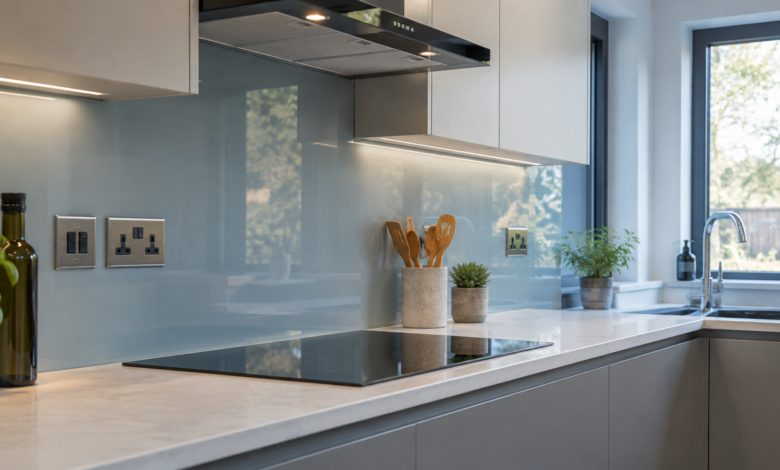
The secret to a clean splashback is planning it around your sockets, switches, and windows before you order a single panel. Your kitchen splashback layout decides where every cut-out sits, and a panel is cut to your exact wall down to the millimetre.


This guide walks through how to plan a splashback around every fixed feature in the kitchen. Get these details down on paper first, and the ordering itself becomes the easy part.
Why Splashback Layout Has to Come Before You Order
A cut-to-size splashback is made for your wall alone, so every socket, switch, and window has to be planned into it from the start. The panel arrives ready to fit, with cut-outs already in place, which means the measurements have to be right before it is cut.
This matters for one simple reason: a cut panel is bespoke and non-returnable. Kitchen renovation planning UK homeowners often rush this stage, then find a cut-out lands in the wrong spot. Careful planning of your kitchen splashback at the layout stage removes that risk entirely.
Planning Around Plug Sockets and Switches
Sockets are the feature most people measure wrong, so start here. Your splashback needs a cut-out for every socket and switch it will surround, each measured to its exact position on the wall.
UK kitchens follow a consistent standard for socket height. Sockets usually sit around 150mm above the worktop surface, which places them clear of a standard upstand. Knowing this kitchen sockets height UK figure helps you plan where the splashback around plug sockets will need its openings.
When measuring for splashback cut outs, note down three things for each socket:
- The height from the worktop to the bottom of the socket
- The distance from the nearest side wall or cabinet
- The size of the socket plate itself
Record these clearly, since the acrylic sheet cut-outs are made from your figures. Accurate numbers here give you a panel that slides straight over every socket for the first time.
Where to Position Sockets Before the Splashback Goes On
A renovation is the ideal moment to rethink where your sockets actually live. While the wall is open, you can add or move sockets to suit how you use the kitchen, before the splashback is measured.
Think about where to put sockets in kitchen zones you use most, such as behind the kettle and toaster. Place a double socket where those appliances sit, rather than where an old plan happened to put them. Good kitchen splashback design starts with sockets positioned for real life, then the panel planned around them.
Two safety distances are worth building into your plan:
- Keep sockets at least 300mm horizontally from a sink
- Keep sockets at least 300mm horizontally from the hob
Setting these positions before the splashback is measured means the cut-outs land exactly where you want them.
Planning Around a Window
A window brings the splashback to a natural edge, so the panel has to meet the reveal cleanly. Measure the full width and height of the opening, and note where the splashback will stop against the frame.
The sill is the detail to watch. Your splashback around window needs to finish neatly where it meets the sill and the reveal, so measure to those edges precisely. A panel cut to these figures sits flush against the window rather than leaving an awkward gap.
Planning Around the Extractor and Hob
The area behind the hob and extractor carries both a cut-out and a heat consideration. Measure where the extractor sits on the wall, so the panel can be shaped to meet or surround it.
A coloured acrylic splashback works across the run behind the hob, with one important note on heat. Acrylic suits induction and electric hobs with a small clearance, and it stays clear of a direct gas flame. For a gas hob, a heat-resistant panel goes behind the flame, with the acrylic splashback behind extractor and along the rest of the wall.
Getting Your Measurements Right: Heights and Templates
Two standard heights anchor most kitchen layouts. The worktop sits at around 910mm from the floor, and the splashback fills the gap from the worktop up to the wall units above. Knowing this kitchen worktop height UK figure helps you work out the panel height you need.
For a straightforward wall, careful measuring is enough. For a tricky layout with several cut-outs or an awkward corner, a splashback template removes the guesswork. Cut a paper or card template to the exact shape, mark every socket and edge on it, and use it to confirm your figures before ordering.
Bringing the Layout Together
A splashback that fits perfectly comes down to planning every fixed feature before you order. Measure your sockets, switches, window, and extractor, note the standard heights, and template anything complex.
With every measurement recorded, ordering an acrylic sheet cut to your layout is simple and precise. The panel arrives ready to fit, and the care you took at the planning stage shows in a clean, professional finish.
Quick Reference: Kitchen Splashback Planning Measurements
| Feature | Standard measurement | Why it matters |
| Worktop height | Around 910mm from the floor | Sets where the splashback starts |
| Socket height | Around 150mm above the worktop | Places the cut-out clear of the upstand |
| Socket from sink | At least 300mm horizontally | Keeps electrics away from water |
| Socket from hob | At least 300mm horizontally | Keeps electrics away from heat |
| Splashback top | Meets the underside of the wall units | Sets the panel height |
Use these as your starting figures, then measure your own kitchen to confirm each one before ordering.
FAQs
Can I add socket cut-outs to a splashback after it is cut?
No, cut-outs are made during manufacture from the measurements you supply. Adding one at home risks cracking the panel, so plan every cut-out before ordering.
What should I do if a socket sits right where two panels meet?
Plan the panel join to fall away from the socket wherever possible. Where a socket must sit near a join, mark it clearly on both panels so each cut-out lines up.
Is it better to template or measure a complex splashback?
A template suits any wall with several cut-outs or an awkward corner. For a simple, straight run, careful measurements recorded on paper are enough.
How do I handle a splashback in a kitchen corner?
Plan two separate panels that meet at the corner, rather than one bent sheet. Measure each wall to the corner point, so the two panels butt together cleanly.